- DIY fixes most minor scratches and dents, saving 70-95% of repair costs.
- Check scratch depth with your fingernail; shallow scratches are repairable.
- Paint touch-up: clean, sand, mask, primer if needed, thin coats, clear coats, cure 24–48h.
- Prepare a wind-free, dust-free workspace at 15–25°C for best results.
Minor scratches and minor dents are inevitable in busy city traffic. Instead of paying high repair shop fees or waiting for insurance processes, you can repair most of these minor damages yourself with professional-looking results.
With a bit of patience, the right tools, and correct techniques, you can save between 70-95% of a shop’s costs while learning valuable auto maintenance skills.
Common Types of Minor Body Damage
Paint Scratches
The most frequent damage is superficial scratches that can be caused by:
- Contact with other cars in crowded parking
- Tree branches when passing through narrow spaces
- Minor vandalism
- Metal objects scratching the body
- Incorrect washing with dirty or contaminated cloths
Depth identification: Run your fingernail over the scratch. If it does not catch, it’s superficial and can be repaired easily. If it catches, it has penetrated the paint layer and will require more effort.
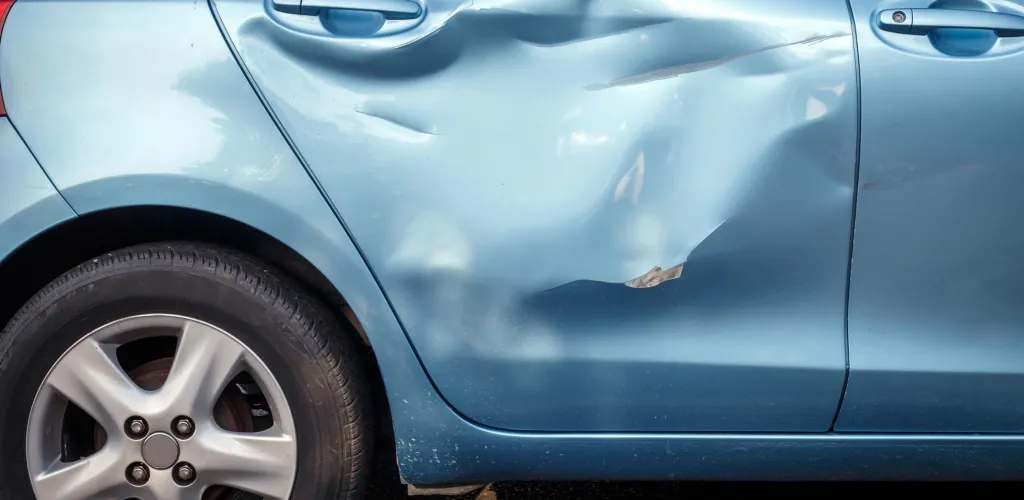
Small Dents and Dings
These damages usually result from:
- Doors of other cars hitting your body
- Impact with stones or solid objects
- Parking in very tight spaces
- Small to medium hail
- Contact with posts or fences during maneuvers
Dents and Deep Scratches
These typically occur due to:
- Stones kicked up by other vehicles on highways
- Contact with metal fences or sharp edges
- Vandalism with keys or metal objects
- Minor accidents with bicycles or other objects
Lighting System Issues
The most common damage to headlights and taillights:

- Cracked glass from minor impacts
- Bulbs burned out from normal wear
- Interior condensation from damaged seals
- Oxidation of reflectors due to age
Method 1: Paint Touch-Up for Scratches
When to apply: For superficial scratches that have not reached the base metal.
Preparing the work area
- Choosing the location: Work in a wind-free, dust-free space, away from direct sunlight.
- Temperature control: Ideal temperature is between 15-25°C with low humidity.
- Lighting: Ensure even lighting to spot imperfections.
Step-by-step process
-
Initial cleaning: Wash the area with automotive soap and water, then degrease with isopropyl alcohol.
-
Preparing the surface: Use fine-grit sandpaper (400-600 grit) to smooth the surface. Work in light circular motions without heavy pressure.
-
Masking the area: Protect surrounding surfaces with painter’s tape and protective film to avoid overspray.
-
Applying primer: If the scratch reaches the primer layer, apply 2-3 thin coats of primer, letting 10-15 minutes between coats.
-
Painting step: Apply the paint in 3-4 ultra-thin coats, allowing 15-20 minutes between coats to avoid runs.
-
Clear coat protection: Apply 2 coats of clear coat to protect the paint and restore gloss.
-
Finish: After full curing (24-48 hours), lightly polish with a fine abrasive compound to blend the repair with the rest of the panel.
Crucial tip: Identify the exact paint code from the driver’s door, engine bay, or owner’s manual for a perfect color match.
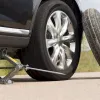
Method 2: Piston Technique for Dents
When to use: For small to medium dents on flat metal surfaces, without cracks in the paint.
Detailed instructions
-
Preparation: Clean the area with soapy water and thoroughly dry. Check that there are no paint cracks that may spread.
-
Moistening: Lightly moisten the piston and the affected area with water to improve adhesion.
-
Positioning: Center the piston precisely over the deepest point of the dent.
-
Applying force: Press firmly to create a vacuum, then pull sharply in a quick, controlled motion.
-
Repetition: Repeat the process 3-5 times, checking progress after each attempt.
-
Finishing: If minor imperfections remain, touch up with paint following the previous method.
Important limitations: Works best on large, flat surfaces (doors, hood, roof). Not effective on edges or ribbed areas.
Method 3: Hammering with PDR Tools (Paintless Dent Repair)
When to apply: For dents on steel panels where you can access from behind and the paint is intact.
Specialized equipment
- PDR hammer set with heads of various shapes and sizes
- Support bar or soft-covered wooden block
- Strong LED light to view details
- Exterior mirrors to check progress from outside
Technical procedure
- Disassembly: Remove interior trim to access the back of the affected panel.
- Damage analysis: Study the shape and depth of the dent to choose the right tools.
- Bar placement: Place the support bar on the exterior surface to counteract the impact.
- Hammering technique: Start with light taps at the dent edges, working toward the center with controlled movements.
- Monitoring: Regularly check progress from outside to avoid overcorrecting.
- Finish: Reinstall upholstery once the result is satisfactory.
Warning: This technique requires experience. Start with small, hidden dents to develop your skills.
Method 4: Specialized Repair Kits
Advantages of complete kits
- Contain all materials and tools needed
- Detailed, step-by-step instructions
- Pre-mixed paint in popular shades
- Excellent value for beginners
- Consistent and predictable results
Standard kit components
- Multi-grit sandpaper (220, 400, 800, 1200)
- Brushes and applicators of various sizes
- Auto body filler with hardener
- Paint, primer, and protective clear coat
- Microfiber cloths for cleaning
- Masking tape and protective film
- Degreaser and surface prep solutions
Choosing the right kit
Basic kit (100-200 RON): Sufficient for superficial scratches and minor damage. Advanced kit (300-500 RON): Includes more paint shades and specialized tools. Professional kit (600+ RON): Higher quality equipment and premium materials.
Method 5: Auto Body Filler Repair for Deep Damage
When to apply: For deep dents, areas where paint is completely removed, or small holes in the panel.
Detailed process
-
Surface preparation: Sand the area with 220 grit to create a rough surface for the filler to adhere.
-
Thorough cleaning: Remove dust with a damp cloth, then degrease with isopropyl alcohol and let dry completely.
-
Filler preparation: Mix the filler with hardener according to the manufacturer’s ratio. Work quickly, as the working time is limited.
-
Application: Apply the filler with a spreader, slightly above the panel level to allow later sanding.
-
Shaping: Shape the surface to follow the body line as closely as possible.
-
Drying: Allow to cure per instructions (usually 2-4 hours at room temperature).
-
Progressive sanding: Sand progressively with finer grits: 400, 600, 800, 1200.
-
Finishing: Apply primer, paint, and clear coat in this order, following drying times.
Professional tip: For best results, apply multiple thin filler layers rather than a single thick coat.
Lighting Repair
For Cracked Headlights and Taillights
- Dismount: Remove the affected component per the vehicle’s manual.
- Damage assessment: If the crack is larger than 5 cm, replacement is recommended.
- Cleaning: Clean the crack with isopropyl alcohol to remove dirt and grease.
- Adhesive application: Use a transparent automotive-grade plastic adhesive, applying to both sides of the crack.
- Hardening: For large cracks, apply a piece of fiberglass mesh on the interior side.
- Finishing: After drying, lightly sand the excess adhesive and polish to restore transparency.
For Burned-Out Bulbs
- Identify the type: Check the exact bulb type (H1, H4, H7, LED, xenon) in the manual or on the bulb.
- Safety: Disconnect the battery and let headlights cool if recently used.
- Access: Open the hood and access the bulb socket from behind the headlight.
- Replacement: Remove the faulty bulb and install a new one, avoiding touching the glass with bare hands.
- Testing: Reconnect the battery and test the function before closing up.
Optimal Working Conditions and Safety Measures
Environmental factors
Ideal temperature: 18-25°C for best adhesion and drying. Relative humidity: 40-60% to avoid condensation and adhesion issues. Ventilation: Ensure airflow to vent toxic fumes. Lighting: Even lighting, with minimal glare that hides imperfections.
Personal Protective Equipment
- Nitrile gloves: Solvent and paint resistant
- Safety glasses: UV and splash protection
- Respirator mask: Particulate and organic vapor filters
- Protective clothing: Coveralls and closed-toe shoes
Workshop safety
- Adequate ventilation: Natural or forced to remove fumes
- Gas and vapor detectors in enclosed spaces
- ABC fire extinguisher for all fire types
- Fully stocked first aid kit
- Explosion-safe lighting in solvent areas
When to Call Professionals
Situations that exceed DIY repairs
- Structural damage: Any issue affecting structural integrity or vehicle safety
- Complex systems: Repairs involving airbags, sensors, cameras, or driver-assist systems
- Vehicles under warranty: Risk of voiding warranty with unauthorized interventions
- Luxury vehicles: Special paints (metallic, pearl, matte, chrome) requiring specialized equipment
- Extensive damage: Scratches spanning multiple panels or requiring full panel repaint
- Structural repairs: Panel replacement, welding, or body modifications
Cost Analysis and Savings
| Type of Repair | DIY Cost | Service Cost | Savings | Time Required |
|---|---|---|---|---|
| Superficial Scratches | 30-80 RON | 300-600 RON | 75-85% | 3-4 hours |
| Small Dents | 20-60 RON | 400-1000 RON | 85-95% | 1-3 hours |
| Complex Paint Touch-Ups | 50-150 RON | 500-1500 RON | 70-80% | 5-8 hours |
| Bulb Replacement | 25-120 RON | 120-400 RON | 60-80% | 30-60 min |
| Taillight Repair | 40-100 RON | 250-800 RON | 70-85% | 2-4 hours |
Return on Investment Calculation
Initial investment: A complete repair kit costs 300-800 RON. Amortization: Paid back after 2-3 major repairs. Long-term benefits: Savings of 2,000-5,000 RON per year for an active driver.
Essential Equipment for Different Levels
Beginner Kit (200-400 RON)
Basic Materials:
- Sandpaper (150, 220, 400, 800, 1200 grit)
- Touch-up paint with the exact car code
- Universal primer and clear coat
- Auto body filler with hardener
- Rubber piston (3 sizes)
Tools:
- Brushes and applicators
- Putty knives
- Microfiber cloths (minimum 10)
- Masking tape and film
- Degreaser and isopropanol
Advanced Kit (600-1000 RON)
Additional Equipment:
- Portable air compressor
- Basic paint spray gun
- Orbital polisher with discs
- Compact workshop vacuum
- LED lighting system
- Thermometer and hygrometer
Professional Kit (1500+ RON)
Specialized Equipment:
- Complete PDR set with hammers and bars
- HVLP spray gun with adjustable settings
- Portable spray booth
- Colorimeter for exact color matching
- Compressor with tank and moisture filter
- Full extraction and filtration system
Preventive Maintenance to Minimize Damage
Monthly Plan
- Professional washing: Use the two-bucket method and microfiber cloths.
- Wax application: UV and contaminant protection.
- Visual inspection: Early identification of minor problems.
- Lighting check: Test all bulbs and lighting systems.
Seasonal Plan
Spring:
- Thorough cleaning after winter
- Apply sealant or ceramic coating protection
- Check for damage from road salt
Summer:
- UV protection against intense sun
- Frequent insect cleaning
- Check for hail damage
Autumn:
- Preparation for winter
- Protection against leaves and tree sap
- Check seals and systems
Winter:
- Protection against salt and chemicals
- Regular cleaning of lower panels
- Monitor for corrosion
Troubleshooting Common Problems
Paint Application Problems
Paint runs or bubbles:
- Cause: Over-application, incorrect temperature, or contaminated surface
- Solution: Sand and reapply in thin coats at the correct temperature
Color mismatch:
- Cause: Incorrect color code, expired paint, or fading of the original color
- Solution: Verify the original code, test on a hidden area, possibly recalibrate color
Rough surface remaining:
- Cause: Dust in paint or incorrect application conditions
- Solution: Sand with fine paper and polish
Filler Issues
Filler cracking:
- Cause: Too thick application, incorrect mix, or rapid drying
- Solution: Remove and reapply in thin layers
Poor adhesion:
- Cause: Unprepared, dirty, or overly smooth surface
- Solution: Clean and sand thoroughly before application
Sinking filler:
- Cause: Shrinkage during drying
- Solution: Apply an additional layer and sand
Modern Trends in Auto Repairs
Innovative Materials
Self-healing films: Shape-memory technology that heals with heat. Nano paints: Self-cleaning properties and enhanced durability. Structural adhesives: Alternatives to welding for certain applications. Composite materials: Carbon fiber and hybrid materials for reinforcement.
Digital Technologies
Mobile apps: Identify color codes via camera. Augmented reality: Step-by-step repair guidance. AI color matching: Intelligent color analysis systems. E-commerce platforms: Automatic ordering of materials based on damage.
Resources and Reputable Suppliers
Popular Online Stores in Romania
- eMAG Auto: Wide range, competitive prices, fast delivery.
- Autodoc: Auto parts specialist, technical support.
- Pieseauto.ro: Parts and accessories, service equipment.
- Tool Shop: Professional tools and workshop equipment.
Physical Stores
- Dedeman: Well-stocked auto section with salesperson advice.
- Hornbach: Paint and repair materials.
- Local stores: Personalized advice and negotiable prices.
Educational Online Resources
- Romanian automotive forums: Real experiences and practical tips.
- YouTube: DIY auto repair channels.
- Manufacturer sites: Technical specs and official guides.
- Facebook groups: Active automotive communities.
Conclusion
Repairing minor car damages is a practical skill that offers substantial financial benefits and personal satisfaction. With a modest initial investment and some practice, you can address most superficial bodywork issues with near-professional results.
Key takeaways:
- Significant savings: 70-95% compared to a professional service
- Full flexibility: Work when and how you prefer
- Skill development: Valuable abilities for life
- Better vehicle knowledge: Deeper understanding of your own car
- Personal satisfaction: Pride in a job well done
For beginners:
- Start with simple projects like superficial scratches
- Invest gradually in more advanced equipment
- Document the process for ongoing learning
- Prioritize quality over speed
- Seek advice from experienced professionals
Important warnings:
- Always follow safety norms
- Do not exceed your level of experience
- For vehicles under warranty, consult the dealer
- For complex situations, consult specialists
Practice and perseverance are the keys to success. Your first repair might not be perfect, but with each project you’ll gain experience and confidence. The time and materials invested will pay off quickly, and the skills you develop will benefit you in the long run.
Start today with your first project and discover the satisfaction of maintaining your car in a professional and cost-efficient way.