
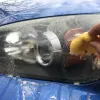
- Hazing from UV exposure reduces nighttime visibility and safety.
- Wash headlights to differentiate dirt from hazing; hazing requires restoration.
- Toothpaste method uses mild abrasives to remove hazing, with masking tape protection.
- Glass cleaner and polish restore clarity via circular polishing; masking tape protection advised.
Cloudy headlights are a common issue affecting most older vehicles. This problem does not necessarily indicate poor maintenance—even the most diligent owners face it. Hazing is a natural process caused by UV exposure, dust, dirt, and atmospheric chemicals.
Reducing headlight clarity not only affects the car’s aesthetic appearance but can seriously compromise safety during nighttime driving. Fortunately, this issue can be solved at home using simple methods and affordable materials.
Evaluating the problem and initial preparation
Before starting any restoration process, it’s important to determine whether the problem is indeed hazing or just dirt buildup. Thoroughly wash the headlights with warm water and car detergent, using a microfiber cloth.
If after this initial cleaning the headlights remain hazy, you are surely dealing with polycarbonate plastic hazing. This damage requires a more aggressive approach to remove effectively.
Method 1: Toothpaste cleaning
Materials needed
- Toothpaste (any type will work)
- Microfiber cloths
- Masking tape
- Protective gloves
- Car wax (optional)
- Clean water
- Car detergent
Step-by-step process
1. Surface preparation Start by thoroughly washing the headlights with water and car detergent. Use firm but controlled motions to remove all surface dirt. Rinse with clean water and let it dry completely.
2. Protecting adjacent areas Applying masking tape around the headlights is essential to protect the paint and plastic components on the body. This precaution will save you time and future headaches.
3. Applying the toothpaste Moisten a clean cloth with water and apply a generous amount of toothpaste. Rub the headlight surface with small circular motions, applying moderate pressure. Dedicate about 5 minutes per headlight, ensuring you cover the entire surface evenly.
4. Rinsing and finishing Thoroughly rinse the headlights to remove all toothpaste. For extra protection, you can apply a thin layer of car wax using a clean cloth in circular motions.
Why this method works?
Toothpaste contains fine abrasives that remove the hazed superficial layer of the polycarbonate. These abrasives are fine enough not to damage the plastic, yet effective enough to remove opacity.
Method 2: Glass cleaner and car polish combination
Materials needed
- Quality car polish
- Glass cleaner
- Microfiber cloths
- Masking tape
- Protective gloves
- Polishing machine (optional)
- Car wax (optional)
Application process
1. Preparing the workspace As in the previous method, isolate the areas around the headlights with masking tape and wear protective gloves if you have sensitive skin.
2. Preliminary cleaning Liberally spray the headlights with glass cleaner and wipe the surface with a microfiber cloth. This step removes grease residues and prepares the surface for polishing.
3. Applying the polish Apply the car polish with a clean cloth and rub the surface in circular motions for at least 5 minutes per headlight. To speed up the process, you can use a low-speed polishing machine.
4. Finishing Rinse with clean water and, if you want long-term protection, apply a layer of car wax.
Effectiveness of this method
The glass cleaner preps the surface by removing residues, while the car polish, with its controlled abrasives, restores the clarity of the polycarbonate.
Method 3: The professional polishing kit
Materials included in the kit
A complete headlight restoration kit typically contains:
- Specialized headlight polish
- Sandpaper with different grits (1000-5000)
- UV protection solution
- Special cloths
- Prep detergent
Detailed process
1. Initial preparation Protect surrounding areas with masking tape and wash the headlights with the kit’s included detergent or a mild car detergent.
2. First polishing stage Apply the polish with a clean cloth in small circular motions, dedicating enough time for the active ingredients to take effect.

3. Progressive sanding Start with 1000-grit sandpaper kept continuously wet. Rub the surface with back-and-forth motions (not circular). Progressively advance to finer grits: 2000, 3000 and final 5000.
Note: Always keep the sandpaper wet to avoid permanent scratching of the plastic.
4. Applying UV protection After the final rinse, apply the UV protection solution included in the kit to prevent rapid hazing in the future.
Advantages of the professional kit
This method is the most comprehensive and provides long-term results. Professional kits are designed specifically for polycarbonate and include all materials needed for a complete restoration.
Interior problems of headlights
Hazing can also affect the interior of the headlights, although this is less common. If you notice condensation or moisture droplets inside, the headlight will need to be dismantled to access the inner surface.
Signs of interior problems
- Persistent condensation
- Water spots on the inner surface
- Reduced light output even after cleaning the exterior
Addressing interior problems
Treat the interior using the same methods as for the exterior, but with extra precautions for electronic components. If you don’t feel comfortable dismantling the headlights, consult a specialist.
When to seek professional services
If none of the mentioned methods provide satisfactory results or if the polycarbonate shows cracks or deep damage, professional intervention will be required. In some cases, full headlight replacement may be more economical than restoration.
Preventing future headlight hazing
- Regularly apply car wax to the headlights
- Avoid prolonged parking in direct sun
- Clean the headlights weekly with car detergent
- Use UV-protective solutions after each intensive cleaning
- Periodically check seal integrity to prevent condensation
For best results, repeat the restoration process every 6-12 months, depending on how the vehicle is used. Regular maintenance will prevent severe hazing buildup and keep the headlights in optimal condition for your safety and that of other road users.
Photo sources: howtocleanthings.com, thejournal.ie, meineke.com