- Hazy headlights come from UV, abrasion, oxidation, and dirt on polycarbonate
- Haze can block up to 50% of the headlight’s light output
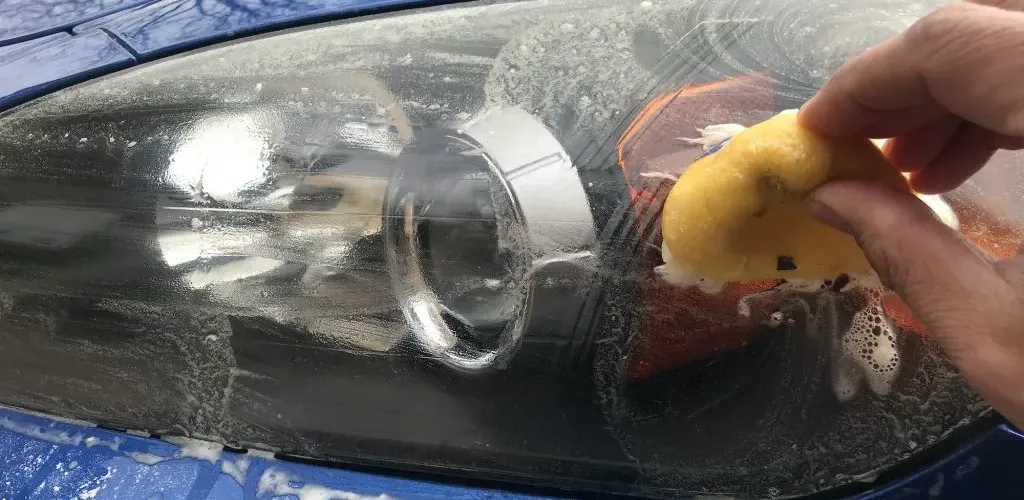
- Paste method: 3-4 tbsp baking soda with lemon juice, apply, rub, rinse, dry
- Lemon-as-sponge method: rub with lemon half coated in baking soda, re-dip as needed
Hazy and yellowed headlights are a common problem for any car owner. Regardless of brand or model you drive, factors such as accumulated dirt, UV exposure, and the natural oxidation process cause polycarbonate headlights to become cloudy over time. This phenomenon not only affects the vehicle’s aesthetics but also reduces the light output efficiency of the headlights, compromising visibility at night or in adverse weather conditions.
There are professional solutions for restoring headlights, but before calling an auto service or investing in expensive polishing products, you can try simple and effective home methods. Two of the most accessible solutions involve ingredients you probably already have in your kitchen: baking soda with lemon or toothpaste.
Why headlights become hazy and yellow
Headlights today are made from polycarbonate, a tough plastic material that is still susceptible to degradation. The protective clear layer applied at the factory wears away slowly due to:
- UV exposure that breaks down the plastic material
- Abrasion caused by sand and gravel kicked up from the road
- Oxidation in the presence of moisture and oxygen
- Accumulation of dirt, insects, and chemical residues from the road
These processes make the headlight surface rough and milky, ultimately blocking up to 50% of the light emitted by the bulb.
Baking soda and lemon method
This is one of the most effective natural methods for cleaning headlights, thanks to the gentle abrasive properties of baking soda and the acidity of lemon that helps dissolve deposits.
What you need
- A bag of baking soda
- 1-2 fresh lemons
- A mixing bowl
- Warm water
- Microfiber towel or clean cloth
- Protective gloves (optional)
- Masking tape (optional, to protect the paint)
Option 1: Cleaning paste
This method gives you better control over the consistency and application of the product:
- Prepare the mixture: In a bowl, mix 3-4 tablespoons of baking soda with the juice from half a lemon
- Add water: Gradually incorporate warm water until you obtain a paste with a dense consistency, similar to toothpaste
- Apply to headlight: Using a cloth or directly with your hand, apply the paste evenly on the headlight surface
- Rub in circles: With gentle circular motions, rub the paste on the headlight for 2-3 minutes
- Let it act: Allow the paste to act for another 2-3 minutes
- Rinse thoroughly: Use warm water to remove residues
- Wipe and dry: With the microfiber towel, wipe the headlight until completely dry
Option 2: Lemon as a sponge
This method is faster and requires fewer tools:

- Prepare the lemon: Cut a lemon in half
- Coat with baking soda: Sprinkle baking soda directly on the cut surface of the lemon
- Apply to headlight: Use the lemon half as a sponge, rubbing directly on the headlight surface
- Add more baking soda: As the baking soda is consumed, dip the lemon into more baking soda
- Scrub persistently: Focus on more opaque or yellowed areas
- Rinse and dry: Finish the same as in the first variant
Method using toothpaste
Toothpaste contains fine abrasives and whitening agents that work excellently on polycarbonate headlights.
Cleaning process
- Choose the right toothpaste: Prefer white, classic toothpaste, without gel. Whitening toothpastes are ideal
- Apply to a sponge: Put a generous amount of toothpaste on a soft sponge or a cloth
- Rub the headlight: With firm circular motions, rub the entire surface of the headlight for 3-5 minutes
- Pay attention to problematic areas: Focus on the more opaque zones
- Rinse with warm water: Toothpaste is sticky, so you’ll need warm water and several rinses
- Check the result: After drying, inspect the headlight. If needed, repeat the process
Important tips for best results
- Clean headlights in shade: Do not work in direct sun, as the mixture dries too quickly
- Protect the paint: Use masking tape around the headlight to avoid scratches on the paint
- Test on a small area: Before treating the entire headlight, test the method on a corner to check the result
- Repeat if necessary: For very hazy headlights, the process may be repeated 2-3 times
- Work on one headlight at a time: Focus on one headlight, then move to the other to maintain consistency
How often should headlights be cleaned
The cleaning frequency depends on several factors:
- Parking conditions: Cars parked outdoors require more frequent cleaning
- Miles driven: The more you drive, the faster headlights get dirty
- Climate: Humid areas accelerate oxidation
- Age of the car: Older headlights require more regular maintenance
In general, a cleaning every 3-6 months is sufficient to maintain appearance and function.
When to call a professional
Although home methods work for mild to moderate opacification, there are situations when professional intervention is necessary:

- Deep oxidation: When the opacity penetrates the inner layers of the polycarbonate
- Deep scratches: That cannot be removed by simple cleaning
- Cracks or fractures: Requiring headlight replacement
- UV layer damage: When the protective layer is completely worn out
A specialized service can perform:
- Professional sanding: Using polishing machines and gradual abrasives
- Complete restoration: Removing all oxidized layers
- Application of a new protective coating: A UV-resistant clear coat that protects the headlight long term
Headlight protection after cleaning
To maintain the results for longer:
- Apply car wax: A wax layer provides additional protection against UV
- Use headlight protection products: Sprays or sealant coatings that seal the surface
- Wash the car regularly: Dirt buildup accelerates degradation
- Park in shade when possible: Limit direct sun exposure
The importance of clean headlights for safety
Headlights are not just an aesthetic element — they are vital for your safety and that of other road users. Studies show that hazy headlights can reduce visibility by up to 50%, equivalent to driving with headlights half on. At night, in rain or fog, this reduction can mean the difference between spotting an obstacle in time or being involved in an accident.
Auto policies in many countries consider hazy headlights a reason for failing periodic technical inspection, precisely due to the safety risks they pose.
Conclusion
Cleaning headlights with baking soda and lemon or with toothpaste is a simple, inexpensive, and effective solution to restore clarity and function. The process takes only a few minutes, and results are visible immediately. However, for severely damaged headlights or long-term protection, consulting a professional remains the best option. Investing in headlight maintenance not only improves the car’s appearance but also contributes significantly to your safety on the road.