- Let engine fully cool for at least 30 minutes before checking.
- Check expansion tank level between MIN and MAX, preferably near MAX.
- Mix coolant: 50:50 antifreeze to distilled water; adjust for climate.
- Use a funnel to top up expansion tank after mixing.
The cooling system is vital for the engine’s optimal operation, and the radiator is the central component of this system. Without an adequate coolant level, the engine risks overheating, which can lead to expensive damage. Checking and topping up the radiator coolant is a simple but essential maintenance task for any vehicle owner.
Coolant circulates through the channels in the engine block and cylinder head, absorbing the heat generated by combustion and transferring it to the radiator, where it is dissipated with the help of the radiator fan. This continuous process keeps the engine temperature within optimal operating parameters.
Checking the radiator coolant level
Materials needed
- Protective gloves
- A towel or rags
- A flashlight (optional)
Procedure
Step 1: Let the engine cool
Make sure the engine is completely cool before starting the check. After turning off the engine, wait at least 30 minutes for the system to cool completely. A hot engine can cause severe burns due to the high pressure in the system.
To test the temperature, gently touch the hood. If it is still warm, wait until it cools completely.
Step 2: Opening the hood
Pull the hood release handle from inside the cabin, then locate the secondary hood latch under the hood and lift it fully. Secure the hood with the prop rod for safety.

Step 3: Locating the radiator cap
The radiator cap is at the top of the radiator and usually has a distinctive oval shape. Many modern caps are marked with the cooling system symbol or with the phrase “Engine Coolant Only”.

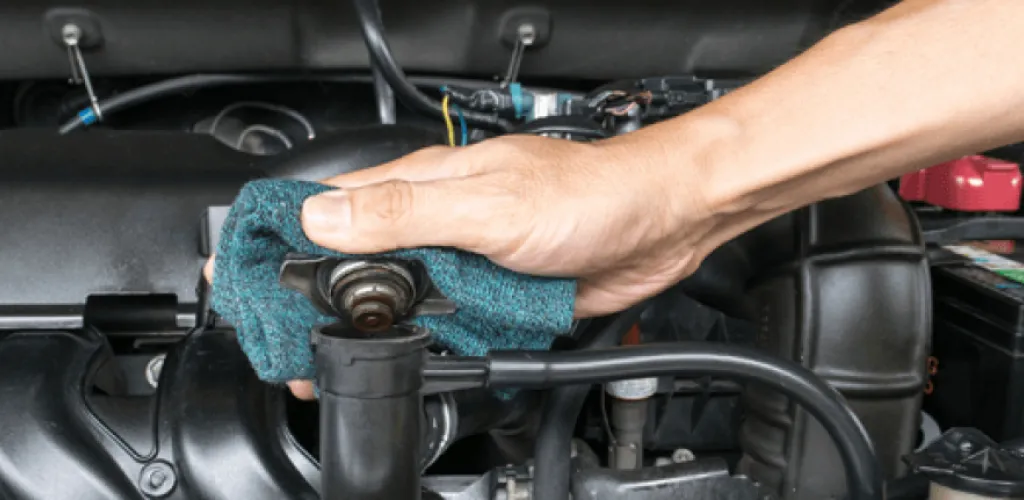
Step 4: Opening the cap
Wrap a cloth around the cap for protection and turn it counterclockwise, applying light downward pressure during turning. This helps release residual pressure from the system.
CAUTION: Never open the cap when the engine is hot. The pressurized system can release hot vapors and cause severe burns.

Step 5: Checking the level
Expansion tank is transparent and has MIN and MAX marks. The coolant level should be between these marks, preferably near the MAX line.
Read also: should the radiator be washed or cleaned
Refilling the coolant
Materials needed
- Quality antifreeze (per the manufacturer’s specifications)
- Distilled water
- Funnel
- Protective gloves
- A container for mixing
Preparing the mixture
The coolant must be a mixture of antifreeze and distilled water in the correct ratio. For most temperate climates, the optimal ratio is 50:50, providing protection against freezing down to -37°C and against boiling up to 108°C.
Recommended proportions:
- Moderate climate: 50% antifreeze + 50% distilled water
- Very cold climate: 60% antifreeze + 40% distilled water
- Hot climate: 40% antifreeze + 60% distilled water
Adding the coolant
Step 1: Locating the expansion tank
The expansion tank is located to the side of the radiator and has two hoses connected. This reservoir collects coolant that expands when heated and returns it to the system during cooling.

Step 2: Pouring the coolant
Add the prepared mixture to the expansion tank up to the MAX mark. Use a funnel to avoid spills. If the car does not have an expansion tank, add the coolant directly to the radiator, without exceeding the fill line.
IMPORTANT: If the radiator level is low but the expansion tank is full, there may be a fault with the radiator cap or the expansion tank.
Step 3: Closing the system
Reinstall the radiator cap, ensuring it is tightened properly to maintain system pressure. A cap that is not tightened can cause pressure loss and overheating.
Testing and final checks
Starting the engine
Start the engine and let it idle for 5-10 minutes. Watch the temperature gauge on the dashboard – it should stay in the normal operating range.
Checking the fan
The radiator fan should start automatically when the engine temperature rises. Listen for unusual noises that could indicate fan problems.
Checking for leaks
Inspect all hoses, connections, and the underside of the car for possible leaks. New coolant additions can make existing leaks more visible.
Preventive maintenance
Frequency of checks
- Check the level monthly
- Replace the coolant completely at 40,000-80,000 km (per the manual)
- Inspect hoses annually
Warning signs
- Rapid drop in coolant level
- Brown or dirty coolant
- Presence of oil in the coolant
- Frequent engine overheating
Special situations
Be especially careful in very hot weather, in heavy traffic, or when towing. These conditions put extra load on the cooling system and can cause overheating if the coolant level is not adequate.
Maintaining an optimal coolant level is much more economical than repairing an engine damaged by overheating. At the first sign of a level drop, top up the system and check possible causes of coolant loss.
If you notice frequent coolant leaks, consult a qualified mechanic to identify and repair the issue. A faulty cooling system can cause major engine damage in a very short time.
Photo sources: fujairahchemical.com, stewartsdonnybrookauto.com, gobdp.com