- A proper recharge can save money and extend battery life.
- Frequent short trips, faulty alternators, worn belts, and corroded connections cause discharges.
- Extreme temperatures, aging, and vibrations reduce capacity and lifespan.
- Different battery types require specific charging voltages and safety practices.
The car battery is the heart of the vehicle’s electrical system, providing the power needed to start the engine and run all electronic systems. A discharged battery does not automatically mean you must replace it—most of the time, a proper recharge can save significant money and extend the battery’s life.
Understanding the charging process and applying the correct methods are essential for maintaining the vehicle’s performance and avoiding costly problems. In this detailed guide, you will learn all safe charging methods, the necessary equipment, and the secrets of effective preventive maintenance.
Why car batteries discharge
To effectively address a discharged battery, you need to understand the main causes that lead to this situation:
Mechanical and usage causes
- Frequent short trips: The alternator needs at least 20-30 minutes of operation at normal revs to fully recharge
- Alternator problems: The charging voltage should be between 13.8-14.4V with the engine running
- Worn drive belt: Reduces alternator efficiency by up to 40%
- Corroded connections: Increased electrical resistance prevents efficient charging
Environmental and aging factors
- Extreme temperatures: Below 0°C, battery capacity decreases by 20-50%
- Battery age: After 4-5 years, effective capacity can drop below 70%
- Excessive vibrations: Deteriorates internal plates and separators
Permanent electrical loads
- Alarm systems: Consume 20-50mA continuously
- Electronic memories: Radio, ECU, clock — about 10-30mA
- Electrical leaks: Damaged wiring or faulty components
Types of car batteries and their characteristics
Each battery type requires a specific charging approach:
Flooded lead-acid batteries (Wet)
- Nominal voltage: 12.6V when fully charged
- Maximum charging current: 10% of capacity Ah
- Maintenance: Check electrolyte level monthly
- Lifespan: 3-5 years under normal conditions
AGM (Absorbed Glass Mat) batteries
- Advantages: Maintenance-free, resistant to deep discharges
- Charging voltage: 14.4V (more sensitive to overcharging)
- Applications: Vehicles with start-stop systems, premium cars
- Cost: 30-50% more expensive than conventional batteries
Gel batteries
- Features: Gel electrolyte, highly resistant to vibrations
- Charging voltage: Maximum 14.1V (risk of damage at higher voltages)
- Usage: Off-road vehicles, marine applications
Lithium (LiFePO4) batteries
- Advantages: Lighter weight (about 50% lighter), extended life
- Disadvantages: Very high cost, requires BMS (Battery Management System)
- Cold performance: Superior to lead-acid batteries
Essential safety measures
Working with car batteries presents real risks that can be avoided by following safety measures:
Required protective equipment
- Thick rubber gloves: Protection against sulfuric acid
- Safety glasses: Prevent contact with acid splashes
- Old clothing: Acid can permanently damage textiles
- Rubber-soled shoes: Electrical insulation
Workplace precautions
- Adequate ventilation: Batteries emit hydrogen gas — risk of explosion
- Eliminate ignition sources: No cigarettes, tools that spark
- Check battery integrity: Cracks, bulges, acid leaks
- Proper handling: Lift with both hands, avoid tilting
What not to do ever
- DO NOT disconnect the positive cable first — risk of short circuit
- DO NOT charge a frozen battery — risk of cracking
- DO NOT exceed the maximum charging current specified by the manufacturer
- DO NOT mix battery types in the same vehicle
Equipment needed for professional charging
Chargers and their types
Traditional manual chargers:
- Advantages: Low cost, full control over the process
- Disadvantages: Risk of overcharging, requires constant monitoring
- Use: For experienced users
Smart chargers:

- Features: Automatic detection of battery type, automatic shutoff at full charge
- Modes: Bulk, absorption, float, desulfation
- Price: 50-100% more expensive, but safer
- Recommendation: For ordinary users
Microprocessor-based chargers:
- Features: Battery diagnostics, recovery of deeply discharged batteries
- Monitoring: LCD display with detailed information
- Versatility: Suitable for multiple battery types (AGM, Gel, Wet)
Measuring and testing tools
Digital multimeter:
- Essential functions: Measure DC voltage, current, resistance
- Accuracy: At least ±0.5% for reliable readings
- Useful features: Auto-range, hold, backlight
Battery-specific testers:
- Types: Load tester, conductance tester
- Advantages: Quick testing of real capacity
- Results: Battery health percentage
Consumables
- Distilled water: For maintenance batteries (NOT tap water)
- Sodium bicarbonate: Neutralizes acid, cleans corrosion
- Technical grease: Protects terminals against corrosion
- Wire brush: Clean corrosion from connections
Preparing for charging – detailed steps
Diagnosing the problem
Before charging, confirm the battery is the issue:

- Test resting voltage: At least 12.4V for a functional battery
- Check electrolyte density: 1.265 g/cm³ for maintenance batteries
- Visual inspection: Look for cracks, bulges, severe corrosion
- Load test: Voltage should not drop below 10.5V at crank
Preparing the workspace
Location selection:
- Indoor: Ventilated garage, ideal temperature 15-25°C
- Outdoor: Weather-protected area, level surface
- Avoid: Enclosed spaces, proximity to heat sources
Organizing tools:
- All tools within reach
- The charger on a stable surface, at least 1 m from the battery
- Cables checked for wear
- Emergency kit: sodium bicarbonate, water, towel
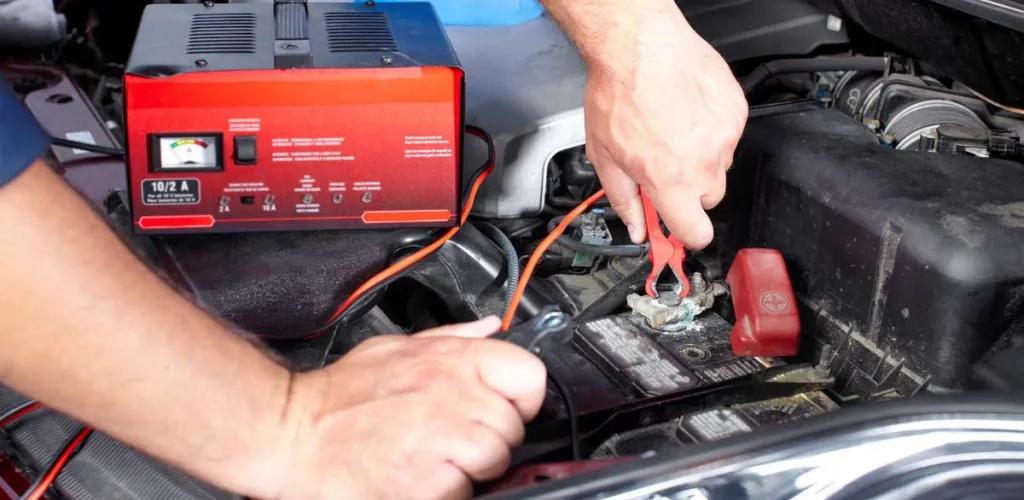
Method 1: Charging with a charger – the complete process
Safe battery removal
Strict order to avoid short circuits:
- Turn off the engine and remove the key
- Engage the parking brake and set the car to Park/Neutral
- Wait 5-10 minutes to stabilize electronic systems
- Disconnect the negative clamp first (black, marked “-” )
- Isolate the negative cable to prevent accidental contact with the terminal
- Disconnect the positive clamp (red, marked “+”)
- Remove the battery from the tray if necessary
Cleaning and preparing the terminals
For light corrosion:
- Mix sodium bicarbonate with water (1:3)
- Apply with a wire brush in circular motions
- Rinse with clean water, dry completely
For severe corrosion:
- Remove heavy buildup mechanically
- Treat with concentrated bicarbonate solution
- Lightly sand with fine sandpaper (400-600 grit)
- Apply technical grease after cleaning
Setting the charger for optimal charging
Identify battery type:
- Wet/Flooded: Charging voltage 14.4V, current 10% of Ah
- AGM: Charging voltage 14.7V, maximum current 30% of Ah
- Gel: Charging voltage 14.1V, maximum current 20% of Ah
Calculating the optimal current:
- General rule: Battery capacity (Ah) ÷ 10 = Charging current (A)
- Example: 70Ah battery → 7A
- For fast charging: Up to 30% of capacity (21A for 70Ah)
- For maintenance charging: 2-3% of capacity (1.5-2A for 70Ah)
Connecting and monitoring the process
Connection order:
- Power off the charger – verify it is unplugged
- Connect the red wire to the positive terminal (+)
- Connect the black wire to the negative terminal (-)
- Check connections – tight and secure
- Plug the charger into the power supply
- Set parameters and start charging
Monitoring during charging:
- First 30 minutes: Check battery temperature (should not overheat)
- At 2 hours: Measure voltage (should rise)
- At 4-6 hours: Check current (should gradually drop)
- Signs of full charge: Current below 1A, stable voltage above 12.6V
Method 2: Jump-start with jumper cables
This method provides only a temporary solution, not a full charging:
Preparing and positioning the vehicles
Donor vehicle requirements:
- Battery in good condition (voltage at least 12.5V)
- Engine capacity similar or higher
- 12V electrical system (do not mix with 6V or 24V)
Proper positioning:
- Gap between hoods: 1.5-3 meters
- Vehicles must not touch
- Easy access to both batteries
- Space to maneuver cables
Step-by-step cable connection
Strict order (VERY IMPORTANT):
- Red to the discharged battery’s positive (first)
- Red to the good battery’s positive (second)
- Black to the good battery’s negative (third)
- Black to a metal ground on the car with the discharged battery (fourth)
CRITICAL NOTE: DO NOT connect the black clamp directly to the negative terminal of the discharged battery — risk of sparks and explosion!
Energy transfer process
Steps to success:
- Start the donor engine and let it run at idle
- Wait 5-10 minutes for voltage stabilization
- Attempt to start the vehicle with the discharged battery
- If it doesn’t start on the first try, wait 3-5 minutes before the next attempt
- After a successful start, let both engines run for 10-15 minutes
- Disconnect in reverse order: black to ground, black to good battery, red to good battery, red to discharged battery
Method 3: Charging by driving
The alternator can recharge the battery, but it requires specific conditions:
Optimizing the charging process
Optimal parameters:
- Engine speed: 1500-2500 RPM steady
- Minimum duration: 45-60 minutes of continuous driving
- Ideal speed: 50-80 km/h on open roads
- Loads to minimize: Disable as many electrical consumers as possible
Loads to avoid while charging:
- Air conditioning (5-10A)
- Seat/steering heater (3-8A each)
- High-beam headlights (10-15A)
- Powerful audio systems (5-15A)
- Cabin fan at maximum (8-12A)
Checking charging effectiveness
Real-time monitoring:
- Battery terminal voltage: 13.8-14.4V with engine running
- Charging current: Measured with a clamp meter
- Battery temperature: Should not exceed 50°C
Calculating charging time
The time required depends on several factors:
Theoretical formula and correction factors
Theoretical time: Time (hours) = [Battery capacity (Ah) × Discharge level (%)] ÷ Charging current (A) × Efficiency factor
Efficiency factors:
- New batteries (0-2 years): 1.1-1.2
- Medium-aged batteries (2-4 years): 1.2-1.4
- Old batteries (4+ years): 1.4-1.8
- Temperature below 10°C: Add 20-30% to time
- Temperature above 30°C: Decrease time by 10-15%
Practical calculation examples
Scenario 1: 60Ah battery, 50% discharged, charging at 6A
- Theoretical time: (60 × 0.5) ÷ 6 × 1.2 = 6 hours
- With an old battery: up to 9 hours
- At low temperature: up to 12 hours
Scenario 2: 70Ah battery, 80% discharged, charging at 10A
- Theoretical time: (70 × 0.8) ÷ 10 × 1.2 = 6.7 hours
- For an AGM battery: 5-6 hours (better efficiency)
- For a gel battery: 7-8 hours (slower charging)
Tips for optimal charging and longevity
Advanced charging techniques
Stage charging (for manual chargers):
- Bulk phase: 80% of capacity at constant current
- Absorption phase: Last 20% at constant voltage
- Float phase: Maintain at reduced voltage (13.2-13.8V)
Periodic desulfation
- Use the desulfation feature of a smart charger
- Frequency: once every 6 months for maintenance batteries
- Benefits: Removes sulfate crystals, increases capacity
Preventive maintenance schedule
Monthly:
- Check resting voltage (minimum 12.4V)
- Clean terminals and apply dielectric grease
- Check electrolyte level (maintenance batteries)
- Test charging with engine running (13.8-14.4V)
Quarterly:
- Capacity test with load tester
- Check alternator belt
- Test alternator under load
- General engine bay cleaning
Annual:
- Replace distilled water (maintenance batteries)
- Full performance test
- Check charging system
- Assess replacement needs
Troubleshooting common charging issues
Battery won’t take a charge
Possible causes:
- Advanced sulfation: Large sulfate crystals block plates
- Internal short circuit: Plates touch; cell is dead
- Insufficient electrolytes: Below plate level
- Old age: Capacity below 50% of nominal
Solutions:
- For sulfation: Slow charging with higher voltage (15.5-16V)
- For short circuit: Battery replacement (irreparable)
- For electrolytes: Top up with distilled water
- For old age: Proactive replacement
Charging takes too long
Diagnostics:
- Measure real charging current
- Check terminal voltage during charging
- Test resistance of connections
- Evaluate battery temperature
Remedies:
- Corroded connections: Clean and tighten
- Insufficient current: Increase charger settings
- Damaged battery: Consider replacement
- Temperature too low: Gentle warming (max 40°C)
Overcharging and its consequences
Symptoms:
- Violent boiling of electrolytes
- Rotten egg smell (sulfurous hydrogen)
- Excessive battery heating (>60°C)
- Case deformation
Prevention:
- Use auto-shutoff chargers
- Monitor voltage (do not exceed 14.7V for wet batteries)
- Regular checks during charging
- Adhere to the maximum current specified by the manufacturer
When to replace the battery
Immediate replacement indicators
Physical damage:
- Cracks in the case with acid leaks
- Bulging or deforming case
- Terminal corrosion or breakage
- Persistent acid smell or rotten egg odor
Poor performance:
- Capacity below 70% of nominal
- Rapid discharge (resting in under 24 hours)
- Inability to hold a charge above 12V
- Hard starts even with a charged battery
Tests to evaluate battery condition
Load test:
- Apply a 50% CCA load for 15 seconds
- Voltage must not drop below 9.6V
- Recovery above 12.4V within 30 seconds
Conductance test:
- Measure internal resistance
- Compare with manufacturer reference values
- Results below 70% indicate replacement is recommended
Choosing a replacement battery
Compatibility parameters
Electrical specifications:
- Nominal voltage: 12V for most cars
- Capacity (Ah): Minimum equal to the original, can be higher
- Cold Cranking Amps (CCA): Suited to local climate
- Hot starting current (HCA): Important in hot climates
Physical dimensions:
- Length, width, height: Ensure fit in the tray
- Terminal position: Align with existing wiring
- Terminal type: European (19.5/17.9mm) vs. American (varied sizes)
Vehicle-type recommendations
For start-stop systems:
- AGM or EFB batteries are mandatory
- Higher capacity: 20-30% above standard
- Cycle resistance: Minimum 300 discharge/charge cycles
For premium vehicles with many consumers:
- High-capacity AGM batteries: 80-110Ah
- Higher CCA for reliable starts in tough conditions
- Extended warranty: Minimum 4-5 years
For normal use:
- Quality wet batteries: Good price/performance ratio
- Reputable brands: Bosch, Varta, Exide, Johnson Controls
- Warranty: Minimum 2-3 years
Charging the car battery correctly is an essential skill that can save hundreds of lei and significantly extend battery life. By following the methods described, using the right equipment, and applying safety precautions, you can keep your car’s battery in optimal working condition and avoid unexpected failures at the worst moments.