- Faulty knock sensor impairs ECU timing, causing poor throttle response and higher fuel consumption
- Check engine light with codes P0325–P0329 indicates knock sensor fault
- Misfires, rough idle, knocking sounds, and possible stalling can result from sensor failure
- Detonation risks damage; the knock sensor helps the ECU adjust timing
The knock sensor is a crucial component for the optimal operation of modern gasoline engines. This sensitive device monitors the vibrations generated by abnormal combustion and transmits vital information to the engine control unit to prevent engine damage.
Detonation is a destructive phenomenon that occurs when the air–fuel mixture auto-ignites before the programmed ignition timing by the spark plug. This process causes chaotic and extremely rapid burning, generating shock waves that can cause serious damage to internal engine components.
What detonation is and why it is dangerous
Normal combustion is initiated by the spark produced by the [spark plug], which ignites the air–fuel mixture in the cylinder. Detonation occurs when the temperature and pressure inside the combustion chamber exceed the fuel’s auto-ignition limit, causing the mixture to ignite spontaneously at multiple points simultaneously.
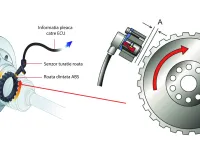
This uncontrolled process creates extreme pressures and vibrations, known as the engine ping or knocking. The knock sensor detects these vibrations and transmits an electrical signal to the ECU (Electronic Control Unit), which adjusts the ignition timing to eliminate the phenomenon.
Main symptoms of a faulty knock sensor
Degraded engine performance
The Powertrain Control Module (PCM) uses information from the knock sensor to optimize ignition timing. When the sensor is faulty, the ECU cannot correctly adjust the ignition advance, leading to:
- Poor throttle response
- Loss of power, especially at high RPMs
- Increased fuel consumption
- Higher emissions
- Irregular engine operation
Check engine light illumination
The check engine light is the first indicator that the Engine Control Unit (ECU) has detected a problem in the engine management system. The codes associated with knock sensor faults include:
- P0325: Knock sensor circuit 1 (Bank 1)
- P0326: Knock sensor circuit 1 - performance
- P0327: Knock sensor circuit 1 - signal low
- P0328: Knock sensor circuit 1 - signal high
- P0329-P0332: Similar codes for sensor 2 (on V6/V8 engines)

To read these codes you need an OBD2 scanner, a essential tool for modern automotive diagnostics.

Misfires and irregular engine operation
The incorrect information transmitted by the defective sensor to the PCM results in:
- Engine misfires, especially under load
- Knocking or pinging sounds from the engine
- Excessive vibrations in the cabin
- Starting difficulties
- Possible engine stalling
- Incomplete combustion
Premature spark plug wear
A faulty knock sensor can cause:
- Frequent spark plug replacement
- Overloading of the ignition system
- Abnormal electrode deposits on spark plugs
- Changes in ignition timing
- Suboptimal air–fuel mix
These spark plug-related issues can be an early indicator of an imminent sensor fault.
Main causes of sensor failure
Natural wear
- Prolonged exposure to extreme temperatures (above 100°C)
- Continuous engine vibrations
- Repeated heating–cooling cycles
Environmental issues
- Corrosion of electrical connectors
- Moisture ingress into electrical circuits
- Contamination with oil or other fluids
Electrical faults
- Intermittent electrical circuits
- Poor contact at the connector
- Damaged wiring
Cleaning and maintenance of the knock sensor
Locating and accessing the sensor
The sensor is usually mounted on the engine block, near the cylinders or on the intake manifold. For the exact location, consult the vehicle’s technical manual.
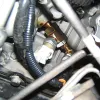
Note: Do not confuse the knock sensor with the temperature sensor — they look similar but have different functions.
Cleaning procedure
Materials needed:
- Isopropyl alcohol (99%)
- Plastic bag
- Appropriate screwdrivers
- Electronic component cleaner
Steps to follow:
- Disconnect the battery for safety
- Locate and access the sensor
- Disconnect the electrical connector
- Remove the sensor (mind the tightening torque)
- Submerge the sensor in the alcohol bag
- Let it soak for 15–20 minutes
- Dry completely (minimum 30 minutes)
- Inspect wiring and connectors
- Reassemble in reverse order

Testing and diagnosing the sensor
Multimeter testing
Equipment needed:
- Digital multimeter
- Ohmmeter (if available)
- OBD2 scanner
Testing procedure:
- Continuity test:
- Measure resistance across sensor terminals
- The value should be between 120–280 kΩ (check the manufacturer’s specifications)
- Absence of continuity indicates a faulty sensor
- Signal test:
- Connect the multimeter to the sensor output
- A constant signal indicates a fault
- The signal should vary with vibrations
- Wiring check:
- Test wire continuity
- Check insulation
- Inspect connectors for corrosion
Step-by-step replacement procedure
Preparing the job
Tools needed:
- Set of wrenches and screwdrivers
- Torque wrench
- New compatible sensor
- Vehicle’s technical manual
Replacement steps
- Removing auxiliary components:
- Remove the intake assembly if necessary
- Remove the throttle body
- Create the required access to the sensor
- Removing the faulty sensor:
- Disconnect electrical connectors
- Remove mounting bolts
- Carefully extract the sensor (avoid forcing)
- Installing the new sensor:
- Check part compatibility
- Mount the new sensor in the correct position
- Tighten bolts to the specified torque
- Reconnect the electrical harness
- Final assembly:
- Reinstall all components in reverse order
- Check all connections
- Test operation
Post-repair verification
- Start the engine and listen for any abnormal sounds
- Use an OBD2 scanner to check for error codes
- Perform a road test to validate the repair
- Monitor engine parameters in the short term
Costs associated with the repair
Although the sensor itself is not an expensive part (roughly 100–300 lei for most vehicles), labor costs can be substantial due to the complexity of access. The total cost can vary between 200–800 lei, depending on:
- Make and model of the vehicle
- Complexity of disassembly
- Shop rates
- Need to replace auxiliary components
It is advisable to take this opportunity to perform a [car service], thereby optimizing costs and preventing other potential issues.
Preventing knock sensor failure
- Use high-quality fuel with the recommended octane rating
- Perform regular engine maintenance
- Replace air and fuel filters on schedule
- Avoid overloading the engine
- Monitor operating temperature
- Periodically inspect the ignition system
Maintaining an optimal engine management system is essential for your vehicle’s performance, reliability, and longevity.