- Stop on a safe, flat surface; hazard lights and triangle as needed
- Check spare pressure and damage; ensure tools (jack, lug wrench, gloves) ready
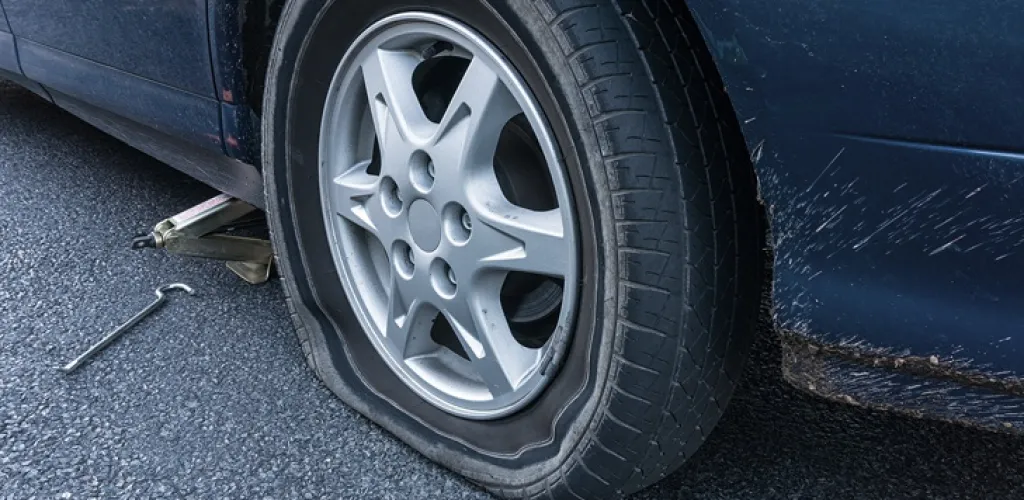
- Loosen lug nuts before lifting; position jack at proper lifting points; lift 2-3 cm
- Remove defective wheel and mount the spare; tighten nuts and secure wheel
Changing a flat tire is a basic skill every driver should master. While it may seem daunting at first, with the right instructions and a little practice, you can perform this operation safely in about 15-20 minutes.
Flat tires can occur at the most inconvenient moments and for a variety of reasons—from nails and screws on the road to shards of glass or sharp metal objects. The key is to know how to respond promptly and safely.
Main causes of tire punctures
- Tread puncture — usually caused by nails, screws or fragments of glass
- Sidewall damage — can occur from impacts with curbs or potholes
- Excess wear — old tires can fail suddenly
- Incorrect pressure — underinflation can lead to overheating and damage
- Aging rubber — after 6-8 years, rubber becomes more brittle
Tools you need for changing a tire
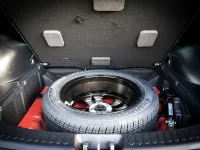
- Spare wheel (regularly checked for pressure)
- Car jack (suitable for the vehicle’s weight)
- Lug wrench or wheel nut toolkit
- Reflective triangle for signaling
- Protective gloves (optional, but recommended)
Steps to change a tire with a flat
Step 1: Stop safely
When you notice you have a flat, the essential first step is to stop the vehicle safely. Look for a flat, stable surface, as far from traffic as possible. Activate hazard lights and, if possible, place the reflective triangle at least 50 meters behind (100 meters on a highway).
Note: Never try to change a wheel on a slope or unstable ground. If the situation doesn’t allow a safe stop, contact a road assistance service.
Step 2: Prepare the tools
Open the trunk and pull out the spare, jack, and lug wrench. Quickly inspect the spare’s condition — it should have the correct pressure and no visible damage.
Step 3: Loosen the lug nuts
Important: Loosen the lug nuts before lifting the car! With the wheel still on the ground, you have enough grip to loosen them. Use the lug wrench and turn counterclockwise. Do not remove them completely yet; just loosen them enough so they can be removed by hand later.
Step 4: Position the jack
Each vehicle has specific lifting points, usually marked in the manual or indicated by visual markers on the chassis. These are reinforced areas designed to bear the car’s weight. Never place the jack on sheet metal or other components not intended for lifting.

Position the jack perpendicular to the ground and adjust the height until it contacts the lifting point.
Step 5: Raise the vehicle
Raise the car gradually until the defective wheel is about 2-3 cm off the ground. Do not lift more than necessary — the higher the car, the less stable it becomes.
Step 6: Remove the defective wheel
Fully remove the lug nuts and place them in a safe spot (preferably inside the wheel cover or in a small container). Pull the wheel toward you with both hands to detach it from the hub. Caution: Wheels can be heavy (15-25 kg), so be prepared for their weight.
Step 7: Mount the spare wheel
Place the spare on the hub, aligning the holes with the lug bolts. You may need to lift the wheel slightly to position it correctly. Hand-tighten the lug nuts until the wheel is secured, but do not tighten with the wrench yet.
Step 8: Lower the vehicle
Lower the car slowly until the spare touches the ground and bears some weight, but not full. In this position, tighten the lug nuts with the lug wrench in a criss-cross pattern (diagonal) to ensure even pressure distribution.
Step 9: Finish
Lower the vehicle completely and remove the jack. Re-tighten the lug nuts, this time with full torque, following the same criss-cross pattern.
Types of spare wheels
Standard spare wheel
Has the same size as the regular wheels and can be used for extended periods.
Temporary spare wheel (“donut”)
Smaller and lighter, intended for short distances (maximum 80 km) at reduced speeds (maximum 80 km/h).
Important safety tips
- Check the spare tire pressure regularly — about every 3 months
- Do not exceed the recommended speed for the temporary spare
- Repair or replace the damaged tire as soon as possible
- Check lug nut tightness after the first 50 km
- Maintain a greater safety distance when using the temporary spare
When to call for professionals
There are situations where it’s safer to call for road assistance:
- On a highway with heavy traffic
- When you don’t have the necessary tools or spare wheel
- When the terrain is unstable or dangerous
- When you don’t feel safe performing the operation
- When lug nuts are seized and cannot be loosened
Maintenance after changing the wheel
After you reach a destination, it is recommended to:
- Have the lug nuts torqued by a service using the specified torque (usually between 80-120 Nm)
- Inspect the damaged tire to determine if it can be repaired
- Replace the temporary spare with a normal tire as soon as possible
- Check wheel alignment if the puncture was caused by suspension issues
Repair vs. tire replacement
Not all punctures require full tire replacement. A small puncture in the central tread can be repaired professionally by:
- Interior patch for punctures up to 6 mm
- Special mushroom plugs for larger holes
- Vulcanization for certain types of damage
Not recommended when:
- The puncture is on the sidewall
- The hole diameter exceeds 6 mm
- The tire has been driven with zero pressure
- There are multiple punctures
- The tire is old (over 6 years)
Changing a flat tire doesn’t have to be stressful. With proper preparation and by following these steps, you can handle this situation safely and efficiently. Always remember that your safety and that of other road users is the number one priority.