- P0332 means Bank 2 knock sensor input voltage is too low.
- Correct diagnosis avoids unnecessary knock sensor replacement.
- Symptoms include power loss, sluggish acceleration, and check engine light.
- Faulty sensor, wiring damage, or mechanical detonation issues.
This guide explains the OBD-II trouble code P0332 and how to diagnose and fix it when Bank 2 knock sensor shows a low input voltage. It covers common causes, symptoms, and practical repair steps. Understanding knock sensor operation helps distinguish between sensor faults and genuine engine detonation issues, preventing unnecessary replacements.
What P0332 Means
The PCM continuously monitors the knock sensor input voltage to detect vibrations caused by abnormal combustion. When the knock sensor signal for Bank 2 is too low, the engine management system cannot correctly assess the level of detonation, which leads to this fault code.
Bank 2 refers to the bank of the engine that does not contain cylinder number 1. In V-type engines, this helps identify the exact location of the problem.
Code Parameter Settings
Typical knock sensor circuits consist of a 5-volt signal wire. If voltage values vary by more than 10% from the manufacturer’s reference voltage, a code will be stored in the PCM and a fault indicator will illuminate on the dashboard.
Some models require several fault cycles for the warning light to alert you. This is a protective measure to avoid false alerts caused by temporary interference.
Symptoms of the P0332 Error Code
Common observable symptoms:
- Lack of engine power, especially during acceleration
- Poor acceleration performance and delayed response
- Check Engine/Service light on on the dashboard
- Audible engine knock, especially under load
- Increased fuel consumption
- Abnormal engine vibrations
The onboard light may stay on constantly, flash intermittently, or come on for long periods and then go out for varying intervals.
Common Causes of P0332 Code
Direct sensor causes:
- Knock sensor faulty or worn
- Wiring damaged to the knock sensor
- Corroded or broken connector
- Short circuit in the sensor circuit
Indirect causes (mechanical issues):
- Incorrect air/fuel mixture that causes real detonation
- Ignition system problems (worn spark plugs, faulty coils)
- Carbon buildup in the combustion chamber
- Uneven engine compression
- Inadequate fuel quality
- Problems with the EGR system
Important: Because the knock sensor is responsible for alerting the PCM to unexpected engine noises, this code is often a symptom of a more serious issue. If you have other codes, ensure they are repaired before diagnosing this code.
Proper Diagnosis of the Problem
Preparation for diagnostic
Many misdiagnoses involve replacing the knock sensor when the problem lies elsewhere. Ensure the knock sensor is actually functioning before replacing it.
Equipment needed:
- OBD2 scanner or code reader
- Digital multimeter
- Oscilloscope (optional, for advanced diagnosis)
- Mechanical stethoscope for locating noises
Locating the sensors
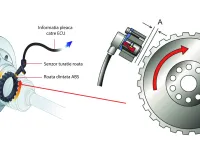
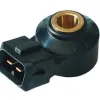
Many manufacturers use one or more knock sensors mounted in the engine block. Typically, V‑block engines require at least 2 knock sensors—one for each bank. Some manufacturers equip vehicles with a knock sensor for each cylinder.
Some models place the knock sensor near the starter; the knock sensor connector is often damaged during starter replacement—this is a common and easily overlooked cause.
Step-by-step Diagnostic Procedure
Step 1: Initial Visual Inspection
Begin diagnosis with a visual inspection of all wiring and connectors. Specifically check:
- Physical condition of connectors
- Signs of corrosion or oxidation
- Damaged or frayed wires
- Oil contamination of the harness
Repair or replace damaged wiring, connectors, and components as needed, disconnected, shorted, or corroded.
Step 2: Scan for Codes
Connect the scanner to the diagnostic port and record all stored codes. This information can be extremely helpful in diagnosing intermittent conditions that may have contributed to storing this code.
After codes are cleared, start and drive the vehicle to see if the code returns. If the code does not come back immediately, you may be dealing with an intermittent condition.
Step 3: Check Engine Condition
Ensure the engine has enough oil—check the level with a dipstick. Continue diagnosing by listening for excessive engine noise.
If the PCM stores other codes, diagnose and repair them before attempting to diagnose this code. It could be a reaction to another engine issue.
Step 4: Sensor Testing
If the engine sounds normal and there are no other codes:
- Disconnect the electrical connector from the affected sensor
- Test the sensor resistance and compare your results with the manufacturer’s specifications
- Replace the sensor if necessary
- Clear the codes and drive the vehicle to confirm the repair was successful
Step 5: Circuit Testing
If the sensor appears to be functioning:
- Disconnect the knock sensor connector
- Test the reference voltage – it should be about 5V
- If there is no reference voltage, inspect the circuit for burnt, shorted, or damaged wires
Attention: Engine oil that has leaked onto the sensor wires can cause major failures.
Step 6: Continuity Testing
If the wiring seems to be in good condition:
- Disconnect connectors from the knock sensor and all related controllers
- Perform continuity and resistance tests on all affected circuits
- Compare findings with the manufacturer’s specifications
- Clear codes and test again to ensure the repair was successful
Important Safety Precautions
Accessibility and Location
Some knock sensors are located in very hard-to-reach areas of the engine; they can be difficult to test without removing major engine components.
Vehicles equipped with such knock sensors should be diagnosed carefully, and the knock sensor should be the last possible failure source.
Replacement Precautions
CRITICAL WARNING: When replacing the knock sensor, ensure it is not located in a coolant passage of the engine block. Removing the knock sensor from a coolant passage can cause severe burns on your hands due to hot coolant.
Intermittent Conditions
Intermittent conditions can be challenging to diagnose and, in extreme cases, may worsen the situation before a correct diagnosis. For these cases:
- Closely monitor real-time data with a scanner
- Perform tests under different operating conditions
- Check the code history for repetitive patterns
- Use freeze-frame data to identify conditions when the error occurred
Preventing Future Problems
To avoid a recurrence:
- Regular maintenance of the ignition system
- Use quality fuel with the recommended octane
- Periodic oil changes to prevent wiring contamination
- Periodic connector inspections for signs of corrosion
- Follow the manufacturer’s recommended maintenance schedule
Accurate diagnosis of P0332 requires a methodical approach and understanding that the issue may lie at the sensor level or in the conditions that cause real detonation in the engine.