- P0050 signals heater circuit issue in bank 2 sensor 1 O2 sensor
- Check engine light, rough idle, reduced fuel economy, possible black smoke
- Common causes: faulty heater, wiring, connectors, blown fuses; PCM faults rare
- Diagnosis requires scanner, multimeter, and careful step-by-step inspection before replacement
The P0050 trouble code is one of the most common OBD-II codes seen on modern vehicles, and it refers to an issue with the heater circuit of the oxygen sensor in bank 2, sensor 1. This problem can significantly affect engine performance and fuel economy, which is why quick and accurate diagnosis is essential.
Integrated heated oxygen sensors play a crucial role in maintaining the optimal air-fuel mixture of 14.7:1, and they are among the most important sensors in the engine management system.
What the P0050 error code means
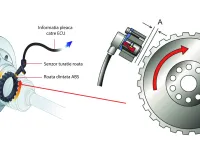
The P0050 code indicates a problem in the heater circuit of the oxygen sensor located on bank 2, sensor 1. This sensor sits upstream of the catalytic converter and monitors the oxygen level in the exhaust gases to optimize the air-fuel mixture.
The designation “B2S1” is interpreted as:
- B2 (Bank 2) — refers to the bank of cylinders that does not contain cylinder number 1
- S1 (Sensor 1) — the sensor upstream of the catalytic converter
Operating parameters and activation thresholds
Normal parameters
- Circuit resistance: approximately 8 ohms
- Permissible tolerance: maximum 10% variation in either direction
- Operating voltage: 12.6-13.8 volts (battery voltage)
- Response time: the sensor should become operational within a maximum of 8 seconds
Activation conditions
The PCM stores the P0050 code and illuminates the malfunction indicator lamp in the following situations:
- Circuit resistance exceeds ±10% tolerance
- Supply voltage does not meet normal parameters
- Sensor response remains constant for more than 8 seconds after engine start
Characteristic symptoms
Direct symptoms
- Check Engine light on the instrument cluster
- Rough engine operation at idle or under load
- Reduced fuel efficiency by up to 20%
- Black smoke emissions from the exhaust under certain conditions
Indirect symptoms
- Difficult engine start, especially when cold
- Slow throttle response
- Idle instability
- Emissions tests failing
Common causes of the P0050 code
Frequent causes
- Defective oxygen sensor — heater element failure
- Wiring problems — damaged wires, shorts, or corrosion
- Electrical connectors — corroded or disconnected contacts
- Blown fuses in the power supply circuit
Less common causes
- Defective PCM (very rare, under 5% of cases)
- Fuel pressure issues (too high or too low)
- Excessive vibrations that damage wiring
- Extreme temperatures affecting components
Common diagnostic mistakes
Many technicians make the mistake of automatically replacing oxygen sensors without a complete diagnosis. This can lead to:
- Unnecessary additional costs
- No resolution of the real problem
- Damage to other functional components
Recommendation: Always perform a full diagnosis before replacing components.
Detailed diagnostic guide
Preparation for diagnosis
Equipment needed:
- OBD2 scanner or code reader
- Digital multimeter with volt/ohm functions
- Manufacturer service manual
- Set of tools for disconnecting connectors
Diagnostic steps
Step 1: Visual inspection
Inspect all system components visually:
- Wiring — look for signs of damage, kinks, or abrasion
- Connectors — ensure they are firmly connected and free of corrosion
- Fuses — check continuity and physical condition
- Sensor — inspect for signs of physical damage
Step 2: Reading codes
- Connect the scanner to the OBD2 port
- Record all present and pending codes
- Note freeze frame data for context
- Clear the codes and test for recurrence
Step 3: Live data analysis
Monitor in real time:
- Sensor voltage (should fluctuate between 100-900 mV)
- Heater status (ON/OFF)
- Engine temperature and heating time
- Control loop (open/closed loop)
Step 4: Electrical testing
Heater resistance testing:
- Disconnect the sensor connector
- Measure resistance between the heater pins
- Normal value: 8Ω ± 10%
Power supply voltage testing:
- Check voltage at the wiring connector
- Normal value: 12.6-13.8V with the engine running
Continuity testing:
- Check continuity between the PCM and the sensor
- Look for opens or shorts
Step 5: Functional testing
Monitore sensor behavior under different conditions:
- Idle
- Under acceleration
- During deceleration
- After the engine reaches full operating temperature
Repair procedure
Common repairs
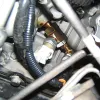
Replacing the oxygen sensor
- Check specifications — ensure you use the correct part
- Prepare the engine — allow it to cool for safety
- Disconnect the battery to prevent short circuits
- Remove the old sensor using the special wrench
- Apply anti-seize compound to the threads of the new sensor
- Install the new sensor following the specified tightening torque
Wiring repair
- Identify the defective point via continuity tests
- Remove the damaged section by about 5 cm in each direction
- Use quality connectors and heat-shrink tubing
- Protect the repair from heat and vibration
Final verification
After completing repairs:
- Reconnect all components
- Clear the error codes
- Start the engine and let it warm up
- Perform a test drive to verify operation
- Re-scan to confirm the issue has been resolved
Prevention tips
Preventive maintenance
- Replace oxygen sensors according to the maintenance schedule (80,000-160,000 km)
- Regularly check wiring in heat-prone areas
- Use high-quality fuel to minimize deposits
- Schedule periodic exhaust system inspections
Avoid problems
- Do not ignore the Check Engine light
- Avoid aggressive driving that can damage sensors
- Promptly repair engine problems that can affect sensors
- Use genuine or high-quality equivalent parts
Estimated repair costs
Indicative prices (RON)
- Original oxygen sensor: 200-600 lei
- Diagnosis labor: 50-150 lei
- Oxygen sensor replacement labor: 100-200 lei
- Wiring repair: 100-300 lei
Note: Prices vary by vehicle make and repair complexity.
Conclusion
The P0050 code requires a systematic approach for accurate diagnosis and durable repair. A solid understanding of the engine management system and a step-by-step diagnostic process will ensure effective problem resolution and prevent recurrence.
If you do not have experience diagnosing automotive electronics, we recommend consulting a qualified specialist to avoid further damage to the vehicle.