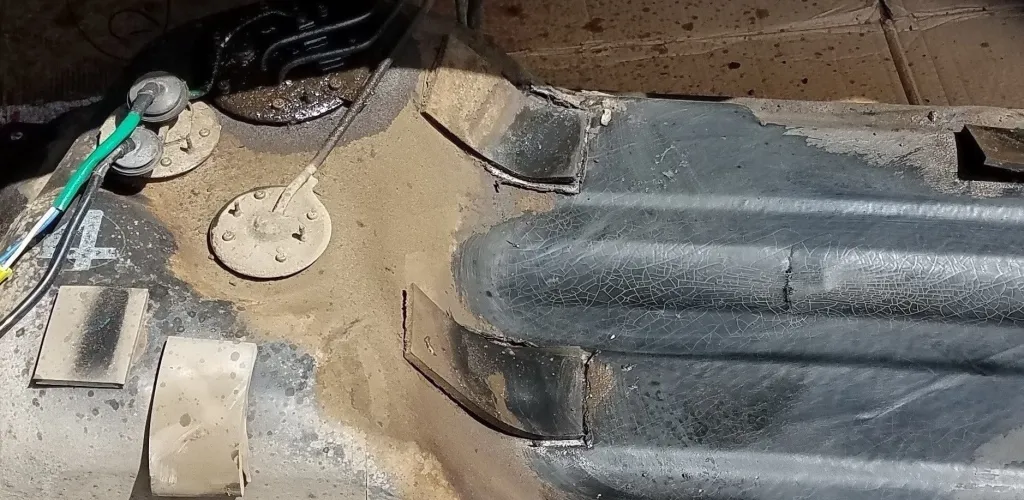
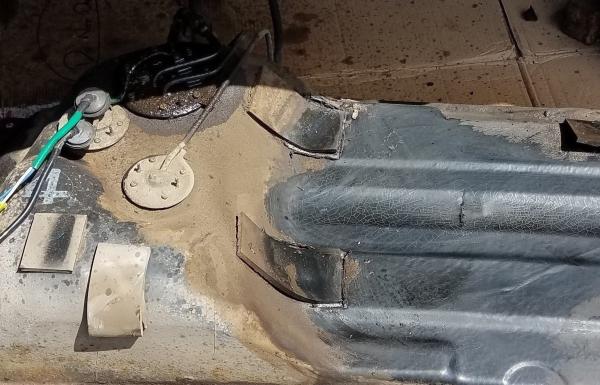
- Cracked fuel tanks pose major safety risks; repair or replacement should be addressed promptly.
- Common causes: impact, corrosion, and manufacturing defects can crack tanks.
- Professional inspection is recommended; extensive damage may require full tank replacement.
- DIY repair possible for small cracks with proper safety, draining fuel and venting space.
Fuel-tank problems, while not very common, can occur in any driver’s life and require prompt intervention. Fortunately, repairing a fuel-tank crack does not involve exorbitant costs and can be tackled by both professionals and DIY enthusiasts, provided strict safety measures are followed.
Before starting any repair, it is essential to understand that a cracked tank presents major safety risks, including the possibility of an explosion. The life expectancy of a car’s fuel tank is normally long, which is why such problems are rare, but when they occur they require immediate attention.
Main Causes of Fuel Tank Cracks
Impact with Blunt or Sharp Objects
The most common cause of fuel-tank cracks is contact with sharp objects from the outside environment. Stones kicked up by wheels, sharp debris on the road, or impacts with curbs can create small cracks that initially seem insignificant. These microscopic cracks tend to grow over time due to fuel pressure and vehicle vibrations.
Chemical Corrosion and Wear Over Time
Depending on where you drive and environmental conditions, corrosion can significantly affect the tank’s integrity. Road salt, high humidity, and contact with aggressive chemicals can weaken the tank material, creating vulnerable spots where cracks can form.
Manufacturing or Installation Defects
Although rarer, manufacturing defects or improper installation can contribute to premature cracking. Weak welds, lower-quality material, or improper mounting can generate stress points that eventually fail.
Methods for Repairing a Cracked Fuel Tank
Consulting a Professional Mechanic
The first and most recommended option is to consult an experienced mechanic for a complete inspection of the fuel system. Specialists can accurately assess the severity of the damage and decide whether the tank can be repaired or requires full replacement.
In cases of extensive damage, full replacement of the tank may be the only viable long-term solution. This option, while more costly initially, ensures complete safety and eliminates the risk of future problems.
DIY Repair - When and How to Do It
For small, localized cracks, a DIY repair can be a viable option, provided strict safety measures are followed. This approach requires basic technical knowledge and adherence to a precise workflow protocol.
IMPORTANT: Never attempt to repair a tank without completely draining the fuel and venting the working space. Fuel vapors are highly flammable and toxic.
Tools and Materials Needed for the Repair
Mandatory Protective Equipment
- Chemical vapor protective mask
- Safety goggles
- Chemical-resistant gloves (vinyl or nitrile)
- Protective clothing
Tools and Working Materials
- Car jack or support stands
- Sandpaper (grit 220-400)
- Clean rag or cloth, lint-free
- Automotive degreaser or isopropyl alcohol
- Epoxy repair kit specifically designed for fuel tanks
- Spatula for application
- Work light
Detailed Steps for Repairing the Fuel Tank
Preparing the Vehicle for Intervention
- Completely drain the tank - Use a transfer pump to remove all fuel
- Lift the vehicle - Use a jack to raise the car and install jack stands under the recommended support points
- Ventilate the work area - Ensure you work in a well-ventilated space, away from open flames or sparks
Locating and Preparing the Affected Area
- Precisely identify the crack - Use a light to locate the exact leak point
- Initial cleaning - Remove dirt and fuel residues from the affected area
- Roughen the surface - Use sandpaper to create a rough surface around the crack (about 5-7 cm around the crack)
Applying the Repair Material
- Final degreasing - Clean the sanded area with a degreaser and let it dry completely
- Prepare the epoxy - Mix the components according to the manufacturer’s instructions
- Apply the material - Fill the crack with epoxy, then apply a uniform layer over the prepared surface

Finishing the Repair
- Shaping the final surface - Smooth the repaired area to remove excess material
- Curing time - Adhere to the manufacturer’s recommended curing time (usually 24-48 hours)
- Repair testing - Add a small amount of fuel and check for leaks
When to Avoid DIY Repair
Situations Requiring Professional Intervention
- Cracks longer than 2-3 cm
- Multiple leak points
- Damage near the fuel pump
- Extensive corrosion of the tank material
- Lack of automotive repair experience
Risks Associated with Improper Repair
A faulty repair can have serious consequences:
- Fire or explosion risk
- Environmental contamination from ongoing leaks
- Damage to other vehicle components
- Additional costs for future repairs
Preventive Measures to Protect the Tank
Regular Inspection
Periodically check the underside of the vehicle for signs of corrosion or damage. A monthly inspection can prevent major problems by early detection of small cracks.
Risk Avoidance
- Avoid driving off-road without underbody protection
- Do not park the car over sharp objects or corrosive debris
- Replace the fuel filter according to the maintenance schedule
Preventive Maintenance
Applying a protective anti-corrosion coating to the exterior of the tank can significantly extend its life, especially in regions with harsh climates.
Conclusion
Repairing a cracked fuel tank is a task that requires careful attention and strict safety measures. Although DIY repair is feasible for small cracks, consulting a specialist remains the safest option. Regardless of the method chosen, never delay repairing a cracked tank—your safety and that of other road users depend on proper fuel-system operation.
Remember that a faulty tank can turn a minor issue into a major safety hazard. Investing in proper repair is always cheaper than the costs of an emergency situation.
Photo sources: imgur.com, instructables.com, shop.advanceautoparts.com