Batteries, in general, are consumable items. They wear out to the point where they can no longer hold an electric charge. They are consumables, and you should consider changing them at a certain interval. If car batteries are used under normal operating conditions, a battery in an Toyota RAV 4 should last a minimum of 5 to 6 years.
Start/stop batteries can be an exception and may last less, even as little as 2 years. There’s a good chance you’ve ended up on our article because your car’s battery has suddenly failed. You may have searched on Google how to disconnect the battery to install a new one and want to make sure you’re following the correct procedure. You’ve come to the right place. That’s exactly what we’ll talk about in today’s article.
The next step you need to take now is to remove the old battery and install a new one. In this article, we’ll explain why you need to follow specific steps when doing this. We know that the operation itself may seem simple, and you might think that many steps are obvious, but it’s never too late to learn exactly how to install the battery in an Toyota RAV 4 correctly.
Here are some quick useful tips regarding disconnecting and changing the battery. We should mention from the beginning that some tips may seem too obvious. If you’ve safely replaced many batteries before, this article may not be tailored to you. However, if you’re doing this for the first time or don’t know the correct procedure from start to finish, you have at least 2 minutes of reading our article, which we’ve written specifically to answer your questions.
Let’s start with the first piece of advice, which should apply in any situation when you want to work on your car. Park it on a flat surface, without a slope. Engage the handbrake and put it in gear one or park if you have an automatic transmission.
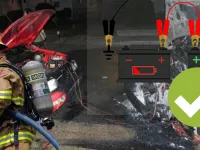
Be cautious with the terminals. Car batteries can discharge a high amperage. Don’t be fooled by the low voltage; a car battery can create problems. Don’t connect the terminals to each other. If you’re using an automotive battery charger to charge the battery, don’t connect the terminals to each other. When connecting the battery to the car, attach the terminals one by one, and try not to let them touch each other. Why do we insist on not letting them touch each other?
For two reasons:
You might accidentally touch them with your hand, and you can get a shock.
If you remove the battery terminals and they touch each other and are left connected for 1-2 hours, all the current in the car will drain out. All the car’s systems will reset. We call this procedure a hard reset. This procedure works wonders if you know what you’re doing. Some sensors might need to be relearned; you need to know which ones, etc. You need to be absolutely sure your car only has one battery. You can create bigger problems this way.
We’ve deviated from the subject. Let’s get back on track.
Pay attention to green deposits on the terminals. They are acidic and toxic, so wear gloves when cleaning them.
How should you correctly disconnect the battery terminals in an Toyota RAV 4?
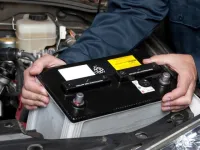
First, you’ll have two plastic covers that need to be removed. After removing the covers, visually inspect the terminals. If you see deposits, use a wire brush to clean them while the terminals are still on the battery.
As soon as you’ve cleaned the terminals of corrosion and acid deposits, always remove the negative terminal first. The negative terminal will often have a screw to be removed, typically 10mm in size. You can do this in 10 seconds with an open-ended wrench. Hopefully, we don’t need to tell you that the negative terminal is the one with a (-) sign on it. Remove the screw, loosen the terminal, set it aside, away from the positive terminal, and as close as possible or even attached to the car’s chassis.
Why should you remove the negative terminal first on an Toyota RAV 4?
Because if you remove the positive terminal first and accidentally touch it to the chassis, you can create a short circuit. It’s the same story with the terminals touching each other. After disconnecting the negative and positive terminals, place them separately from each other.
Once you’ve done that, you need to remove the car battery, which is no longer connected to any terminals and no longer supplying electricity to the car. The battery in an Toyota RAV 4 will have a securing system, in addition to the terminals, that fixes it to the car’s chassis. The securing system can be a metal bracket that slides out or is attached with a base screw of the battery support, or it can even be an easily removable strap. Removing the securing system is easy and takes about 2 minutes in total.
After removing the securing system from the battery and it’s just sitting on the support, you need to take out the defective battery. Remove the battery upright; don’t tilt it to avoid acid spillage. At this step, we recommend wearing gloves again.
Install the new battery, secure it in the support, connect the positive terminal first, and then the negative one. Use a professional tester to reset the car’s computer information about the battery. Reset the BMS on the Toyota RAV 4. Any professional multi-brand tester has this option.
Why should you perform a battery reset on an Toyota RAV 4?
If you don’t reset the battery, the car will think it still has the old one. The old battery has lost some of its properties over the years, and toward the end of its life, the car struggles to charge it using more power. When you install a new battery, the car overexerts it with aggressive, prolonged charging and higher operating temperatures because it thinks it’s still the old battery.
If you don’t perform the reset with the tester, instead of changing the battery every 5-6 years, you’ll end up changing the new one in 1-2 years.
This is the correct process for removing the old battery from an Toyota RAV 4, replacing it with a new one, and adapting the new one.